Gantt
The JavaScript Gantt chart generates beautiful SVG visualizations in all major browsers through a simple API. This Gantt chart library is included along with 150+ standard chart types standard simplifying usage for end users and developers alike.

Introduction
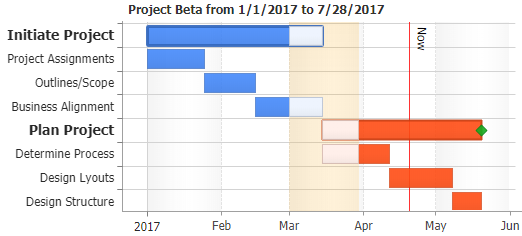
Javascript Gantt charts can be for project management and scheduling individual tasks along a timescale. Additional Gantt related features include task dependency arrows for critical path visualization, milestones, and % complete indicators.
Gantt chart generation is automatic with no custom HTML or SVG editing required. Easily configure options with simple JavaScript settings. Full control is provided using the column series type as it supports all Gantt related features. There are a few common settings that should be used with all Gantt charts.
{
  type: "horizontal column",
  zAxis_scale_type: "stacked",
  xAxis_scale_type: "time",
  legend_defaultEntry_value: "{days(%yRangeSums*1)}d"
}
The stacked Z axis type setting allows adding series data points with the same X values to take up the same space on the X axis.
Milestones
Milestones can be added to the same column series as other related points by using the same start and end Y value and making the point marker visible with configuration such as:
{
  marker_visible: true,
  y: ["1/1/2019", "1/1/2019"]
}
Dependencies

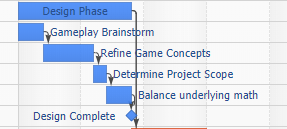
In order to draw a dependency hierarchy in your Gantt chart, the same properties can be used as with organizational charts. Points can have 'id' values and parent properties that indicate which points a point is dependent on.
{
  points: [
    { id: "first", x: "First Project", y: ["1/1/2019", "2/1/2019"] },
    {
      id: "second",
      //Depends on first project
      parent: "first",
      x: "Second Project",
      y: ["2/1/2019", "3/1/2019"]
    }
  ]
}
Multiple dependencies can be specified by listing the id of each parent point
{
  points: [
    { id: "first", x: "First Project", y: ["1/1/2019", "2/1/2019"] },
    { id: "second", x: "Second Project", y: ["1/1/2019", "3/1/2019"] },
    {
      id: "final",
      //Depends on first and second project
      parent: "first,second",
      x: "Final Phase",
      y: ["3/1/2019", "3/1/2019"]
    }
  ]
}
% Complete
Points can include values that indicate the percentage of how much of the task is currently completed. For example, this point configuration specifies that 50% of this task is completed.
{
  y: ["1/1/2019", "1/1/2019"],
  complete: 0.5
}
A range can also be specified for the complete property when used to indicate a different detail such as an upcoming vacation or slack time as follows:
{
  y: ["1/1/2019", "1/1/2019"],
  complete: [0.5, 1]
}
The code above marks the second half of the point instead the first half as the previous example does.
X Axis Ticks
Gantt charts where each data point has a unique name (x value) show the task names on the X axis by default. However, the point.xAxisTick feature can be used to allow using all point related tokens in the axis tick label directly. For example:
{
  defaultPoint_xAxisTick: {
    label_text: "%xValue %yStart %yValue"
  }
}
This makes it much more convenient to define data point related items in axis ticks.
X Axis Data Grid
The above idea of including point details in axis tick labels is very useful but the details are not aligned nicely for readability purposes.
A data-grid like table can be created using X axis ticks by leveraging text tag support with width style values to define column widths of individual task item variables.

First we define the column widths, then two reusable functions to format a list of strings into spans that use those widths:
var columnWidths = [120, 70, 65];
var span = function(val, width) {
  return '<span style="width:' + width + 'px;">' + val + "</span>";
};
var mapLabels = function(labels) {
  return labels
    .map(function(v, i) {
      return span(v, columnWidths[i]);
    })
    .join("");
};
Let's start with a header for this grid by using an annotation positioned near the top left corner as follows:
{
  annotations: [
    {
      position: "0,20",
      label_text: "<b>" + mapLabels(["Task", "Start", "End"]) + "</b>"
    }
  ],
  defaultPoint_xAxisTick: {
    label_text: mapLabels(["%name", "%low", "%high"])
  }
}
Time Span Formatting
Start date and end dates can be shown in point related text properties using the '%yStart' and '%yValue' tokens respectively. In order to show the time span between them the following expression and formatting can be used:
Number of hours
Number of days
Legend values
In the legend, the series level %yRangeSums token can be used to show the total time spans of all tasks in that series. This value can be formatted using expression formatting as above however, expressions are detected when using +-/* chars so we can use '%yRangeSums*1' with the following syntax will ensure the correct result:
Number of hours
{
  legend_defaultEntry_value: "{hours(%yRangeSums*1):number d2}hr"
}
Using Data with JSC.nest()
The nest() functionality can be leveraged with Gantt data to help break data entries into different series and define data field mapping to points. Nest requires using two key() calls. The first key() call identifies the series an entry belongs to and the second key() call identifies a unique property or value that groups items into individual points. If data entries all belong to the same series and each defines a unique data point, a simple dataArray.map() function can be used.
In this example we use nest() to split entries into series, then individual points, and finally we define data field mapping through the pointRollup() call. Consider the following csv data:
Flying,12/21/2018 13:50,12/22/2018 18:50,ORD to Shanghai (14hr 25min)
Layover,12/22/2018 18:50,12/23/2018 19:20,Shanghai Layover
var data = (data = JSC.csv2Json(csvText));
var series = new JSC.nest()
  .key("type")
  .key("start")
  .pointRollup(function(key, vals) {
    var entry = vals[0];
    return {
      x: entry.type,
      y: [entry.start, entry.end],
      attributes: {
        note: entry.note
      }
    };
  })
  .series(data);
If the points don't have a property that identifies unique points, this trick can be used:
var i = 0;
new JSC.nest().key("seriesKey").key(function() {
  return i++;
});
Data Nesting Tutorial Manipulating arbitrary data